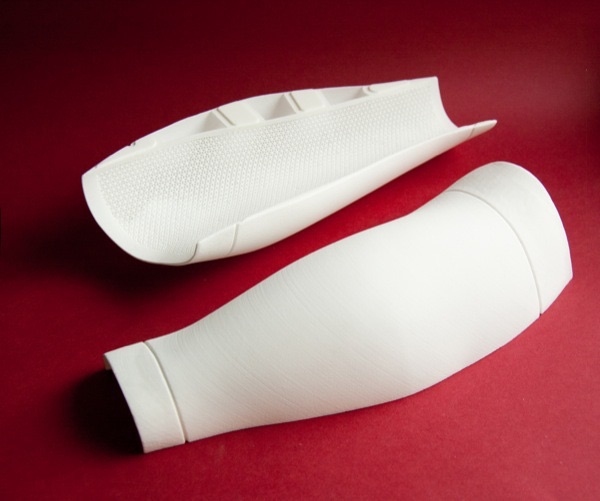
Artec Eva helps create 3D printed prosthetic gastrocnemius muscle
Summary: During a parachute-jump-gone-wrong, a woman lost a significant part of her lower leg muscle (gastrocnemius). After recovery, she was able to walk, yet the damaged leg was highly unattractive to her.
Goal: To use a handheld 3D scanner and scan the lower legs of a woman for the purpose of creating a comfortable, wearable prosthesis for her injured leg.
Tools used: Artec Eva, SOLIDWORKS, ZBrush, 3DS Max, Photoshop
Designing a tailor-made prosthesis is more difficult than it might seem. Learn about the workflow and technology used to develop this prototype.
This story began when a Russian girl named Olga decided to reach out to Can Touch, a Russian provider of industrial 3D printing services, with a special request. Olga is into a very risky sport, skydiving. One of her jumps, though, resulted in an injured gastrocnemius muscle on her right leg – she lost almost all muscle tissue, leaving her leg visibly different from the other one, and making Olga feel uneasy about the way she looked. So she wanted a prosthesis designed specifically to fit her leg.

Prosthesis designing starts
Can Touch got back to Olga and arranged a meeting with her to discuss what needed to be done to create a prosthesis. Together, they mapped out a plan, which included the following stages:
- scanning both legs in 3D
- creating a 3D model
- printing out a prosthesis
- trying out the prosthesis.
Scanning the legs
The first thing to do was to scan both legs, and that’s where Artec Eva came in handy. The scanning was performed by engineer Alexander Gorodetsky, who was actually behind the development of the scanner's form factor. The team needed a very accurate scan, so they made sure to capture every curve.

Eva proved extremely easy to use as it requires no calibration or markers. It captures up to 16 frames per second, which are fused automatically in real time. As a result, you can see exactly which areas you have covered and which ones may need an extra sweep.


Capturing and simultaneously processing up to 2 million points per second, Eva provides high resolution (up to 0.2 mm) and high accuracy (up to 0.1 mm), which makes it an ideal solution for scanning body parts.

Creating a 3D model of the prosthesis
This stage was the most labor-intensive and time-consuming. The job was commissioned to an experienced 3D modeler Valery Karaoglanyan. His task was to create a 3D model of a cosmetic prosthesis using two point clouds (the scans of the healthy leg and the injured leg), taking into account Olga’s requirements. There was no ready-made solution, and the whole job had to be done from scratch.
The first step was to create solid-state 3D models of both legs in SOLIDWORKS. When they were ready, the model of the healthy leg was mirrored; then the solid model of the injured leg was “deducted” from it, and some clearance was set to allow the skin to “breathe.”


The initial idea was to have both the inner and outer parts as mesh surfaces. Olga requested the outer layer be made smooth.
To create a mesh surface, the designers had to “juggle” the 3D model between several programs. It was first imported into ZBrush to create a UV map and a grid module. Then the grid was superimposed on the map in Photoshop, and then the 3D model was imported back into ZBrush. At this stage, the designers faced the problem of setting the thickness of the future prosthesis; ZBrush does not have this feature, which is why they had to use 3DS Max.


The team also developed and 3D modeled fixtures in SOLIDWORKS. When those were ready, they were merged with the master 3D model. In the end, the team obtained a complete, 3D-printing-ready model of the gastrocnemius prosthesis.
3D printing
3D printing was the final straight of the prosthesis creation process. The team used white plastic PA 2200 (polyamide). Very durable and lightweight, this material is perfectly suited for creating a cosmetic prosthesis that is expected to last. The technology used to produce objects from this material is called selective laser sintering – a laser sinters powdered material along specified points.


Trying out the prosthesis
Trying on the prosthesis revealed its strengths and also weaknesses, which were hard to avoid during the first iteration. The fixtures worked well, and the prosthesis fitted the leg perfectly. However, it became clear before too long that it was necessary to use some soft material between the leg and the prosthesis, since the leg sweats, and the material has a slightly rough texture. If the outer layer of the prosthesis had been left as a mesh, the ventilation problem may well have been solved – the leg would have been able to catch some air.


Olga said she liked the prosthesis and that it lived up to her expectations. However, it will take some time to test it in different conditions.
This was Can Touch’s first experience of creating a cosmetic prosthesis. The team made a few mistakes, had to repeat a few processes, and did some unnecessary work along the way. Nevertheless, this experience showed that professional hardware and 3D software, coupled with engineering skills, can produce a high-quality prosthetic device.
You can find more details on the page of the Artec Eva color 3D scanner.
Scanners behind the story
Try out the world's leading handheld 3D scanners.


